 Drywall is a popular material for finishing interior walls. It’s easy to cut and also inexpensive, making it a great choice for DIY projects. You can install drywall on your own in just a few hours or less, or hire a drywall installation professional. Drywall Installation in the Twin Cities MN
Tools You’ll Need
You will need a drywall saw. You’ll want one that is sharp and clean, as well as of a relatively large size. This will make the cutting process easier and more efficient. A tape measure is also important for measuring out your sheets of drywall and calculating how much you need to put up. A utility knife or box cutter makes cutting cleaner edges on your sheets of drywall simpler. It’s not necessary, but a combination square can help make sure everything lines up correctly before you apply any mud or primer to your wallboard seams.
You’ll also want some level pieces of wood that can be used to finish off each row of screws with a flat surface instead of just pushing them through into the studs behind them. Drywall screws are self-tapping in nature; they have threads that allow them to cut their way into hard materials like concrete blocks without needing pre-drilled holes first.
Remove the Old Ceiling
Using a hammer and crowbar, remove the drywall from your old ceiling. You may have to cut out any damaged areas of the ceiling for this step, so make sure you have plenty of scrap pieces of drywall on hand to use as patching material later. If you are working in an older home with plaster ceilings, be careful while removing them because they can crumble easily when hit by a hammer or crowbar. In some cases, you might want to hire a professional drywall contractor to do this job if they’re not experienced enough with taking down plaster walls. Otherwise, it’s best just to be careful not to damage anything else while removing it yourself.
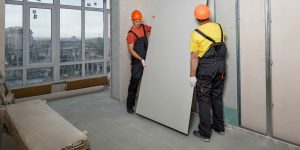
Install the New Drywall
First, use a level to make sure the drywall is straight, and check it with your tape measure. If you have a helper, they can hold the drywall in place while you nail it down. Otherwise, just use clamps or C-clamps to hold the corners in place before nailing them into place.
Once all the corners are nailed down and secured, take out any excess paper from both sides of your seams with a utility knife and sandpaper if necessary (this will help prevent cracks from forming).
Measure up from floor level at each corner of your room and mark an inch-deep line across all four pieces using chalk or pencil. This will give you an extra 1/8″ of material on each side so when it’s time for installation day no one will see any gaps between sheets when standing back far enough away!
Add Joint Compound and Tape
Now that the drywall is in place and you have finished the joint compound and tape, it’s time to start on the seams.
First, use a hammer to pull off any remaining ceiling material. Then remove any fasteners by prying them out of their holes with a flat-head screwdriver or special tool. If there are wooden joists behind your sheetrock, be sure to scrape off any adhesive as well before cutting through the sheetrock with a heavy-duty cutting tool. If you’re using an oscillating saw, lay down cardboard wherever possible so that cut pieces aren’t scattered throughout your home—this will save you from having to vacuum up dust later on!
Once your old ceiling is removed, cut each piece of drywall according to size requirements specified by local building codes. Screws should hold these sheets securely in place. However, if not properly installed they can come loose over time causing water damage inside walls.
Finish With a Sander
Once the drywall is in place, you’ll want to smooth out any rough edges. You can use either a drywall sander or sanding sponge or sandpaper to smooth the surface. You may also find it helpful to use a sanding block in corners and around pipes and electrical outlets where larger tools won’t fit. A vacuum will help remove dust from the area, but be sure not to disturb your freshly-painted walls with too much sweeping!
When all of your joints have been covered, finish nailing through any corners or edges with a pneumatic finish nailer. Cover all exposed nails with joint compound and sand when dry!
Hire a Professional
Drywall installation is generally easy to install, but it does require skill to do it well (and safely). If you aren’t sure whether or not this project is right for you, consult an expert first by asking friends who have installed drywall before or hiring a professional contractor who knows what they’re doing. This will save time—and possibly money—in the long run, because mistakes made during installation will be more expensive than purchasing materials in advance and hiring someone who knows what they’re doing!
Drywall Installation in the Twin Cities MN
We hope you enjoyed this tutorial for installing drywall. As you can see, it’s a relatively simple project that takes some time and patience but is not difficult to do. If you have any questions about the process of installing drywall, please contact the drywall professionals at Home Drywall and Construction in the Twin Cities MN today.