 Taking on a plastering project can seem daunting, but it’s much easier than you might think. Plaster is a mixture of dry ingredients (sand and cement) and water that can be applied over wood or metal lath to create an even surface for painting or wallpapering. Once the plaster dries, it’s more durable than paint and can provide added insulation in the home. Plus, plastering takes about half as long as traditional drywall installation, so if you’re looking for a do-it-yourself project, why not try this one? Or, reach out to your local contractor to do the job for you! Plaster Installation in Apple Valley MN
Getting Started
First, you’ll want to prepare the surface of your wall or ceiling. This means making sure it’s clean and smooth. You may also need to add a layer of primer before applying the plaster.
Next, apply the plaster using a trowel and some water for mixing (you can use a bucket for this). After doing this, let it dry completely before proceeding with another coat. If necessary, repeat these steps until you’ve created as many layers as you desire (the more coats you have on your walls or ceiling, the sturdier they’ll be).
Materials and Tools
Materials and Tools Needed:
- Plaster – Approximately 1 bag per 10 square feet of wall (25 lb bag)
- Mixer – Hand or electric. Electric mixers typically have a larger capacity and are easier to use when working with larger batches of plaster.
- Paintbrush or trowel – For applying the plaster to a wall, you’ll need either a paintbrush or trowel. We recommend using both at different phases of your project; we’ll get into that in more detail later on in this article! Either tool will work fine, but ideally, they should be small enough to reach tight corners easily without getting stuck and causing damage.
Step 1: Tape the Joints
To begin, you’ll need to tape off the entire room. You want to make sure that you tape off all of the joints because if you don’t, the plaster will get on the walls and create bubbles in your finished product. Tape the joints with blue painter’s tape so they can be removed easily later on (when removing the tape, make sure that there is no residue left behind).
Next comes smoothing out any imperfections in your surface by using a sponge and water mixture (1 part water to 2 parts sponging compound). Use a clean sponge and work from the top down to remove air bubbles from underneath your surface. Also, keep an eye out for drips on top of your surface! To prevent this from happening again simply wipe away excess moisture with another dry cloth before using more plaster mix.
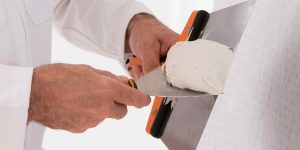
Step 2: Apply a Coat of Plaster
Apply a coat of plaster. Use a trowel to apply at least one coat of plaster over the first layer of mesh, making sure that it gets down into all the cracks in the wall and lays flat against your masonite board. Trowels are available for purchase at any hardware store and can be used for applying paint as well, so if you’re looking to save money by using multiple tools, this is an excellent choice!
Next, level out your surface with a level after each application. Once you have applied enough layers that your wall looks smooth and shiny (but before it begins drying), use a level to make sure that there are no bumps or dips along its surface—these can cause cracking when dry! If there are any such dips or bumps, reapply another layer of plaster until they disappear. Once all appearances of these problems have disappeared, let dry overnight.
Step 3: Apply a Second Coat of Plaster
The third step is to apply another layer of plaster. You can use your trowel to smooth out the surface, or you can use a sponge. If you want something in between those two options, consider using a brush or roller.
You’ll probably have to wait until the first coat dries before you lay down another layer. You can add more plaster once it’s dry and again when it’s half-dry and half-wet—but don’t try to do all of this at once!
Step 4: Finish the Job
Now that you’ve done all the work, it’s time to finish. First, sand the joints with sandpaper or a wire brush to make sure there are no rough edges or places where the plaster has not properly bonded. Apply a second coat of plaster in the same way as before, making sure to trowel down any ridges from your first application. Let this dry for several days before removing the tape and cleaning the joints again. Finally, prime and paint your walls with latex paint (you may want two coats of primer).
Do It Yourself or Hire a Contractor
Doing it yourself is a great way to save money, learn new skills and be proud of your work.
You can save time by doing the plastering yourself. It is sometimes possible to plaster a room in a day or two, depending on the size of the room and how much experience you have. Hiring someone else to do it for you could take several days or weeks and cost thousands of dollars more than doing it yourself! However, if you’d rather leave it up to the professionals, reach out to your local contractor for help installing plaster in your home!
Plaster Installation in Apple Valley MN
Plastering your walls is a great way to add character, warmth, and color to your home. You can easily learn how to install plaster with careful consideration and preparation. The steps involved in this process are simple enough for anyone with basic DIY skills but still have professional results if done correctly. If you’re looking for a professional contractor to do the job for you, look no further than Home Drywall and Painting in Apple Valley, Minnesota. We get the job done right every time. Contact us today!